I’m back with my tutorials in Gimp and, this time, I’ll show you how to put an image (yes, any image you like) in a text. This is pretty easy and fun to do, even for newbies in photo editing and manipulation.
Just follow these steps and you’ll be amazed how wonderful you’ve created :
1. Open your Gimp of course then in File menu>Open. Select the photo or image from your computer that you wish to appear on your text. I use the photo below which I snipped (via Vista’s Snipping Tool).
2. Now, with the image on your screen, type the text you want by clicking the Text tool. Choose the font and size you want and make sure they are big enough for the image background to be visible, cool and attractive to the eye. I use here the Impact Condensed font, size 120.
3. Layers menu> Transparency> Alpha to Selection.
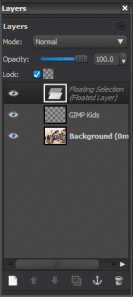
5. Layers dialog> right-click Floating Selection and then click Anchor Layer.
6. Layers> Transparency> Alpha to Selection.
7. In Layers dialog, use the green arrow icon below to move the Text layer under the Background.
8. Right-click the Background and select Add Layer Mask. Make sure Selection is checked and hit Add.
9. Right-click> Merge Down the Background layer.
10. Finally, go to Select menu> click None and you’re done!
I hope you enjoyed it and I’ll be happier if you could leave a comment or anything that would make this blog more user-friendly.
Watch out for the next tutorial – How to lose or gain weight via Gimp photo manipulation!


thank you, yes I did
Hey it wont let me select the float button …its really irritating me could you tell me how to fix it (:
Try to do it again. There might be something you’ve missed. Be sure that you did not missed Step 3 (Layer>Transparency>Alpha to Selection). A layer named ‘Floating Selection (Floated Layer)’ should appear on your layers palette (that highlighted image in Step 5) right after you’ve done Step 3. Proceed with the next steps and you’ll surely get the job done. Goodluck!
awesome i made my logo using this thanks
If I want to add a drop shadow, how would I do that?
Filter menu>Light and shadow>Drop Shadow…
Is there a way to do this with multiple pictures?
Yep. Put them altogether in one whole image then follow the steps provided in this tutorial.
I am trying to do this for an editing challenge and they are pics of a family member and the letters of her name don’t allow me to get her face in the letters. Her name is Trina. Any suggestions?
You might have missed something along the way. Try to do it again, step-by-step. If there’s anything you don;t understand, please let me know so I can help. Thanks.
I was using the wrong type of text. But now my problem is that I am trying to do one with multiple images and have been told I can copy from my computer and paste but GIMP keeps saying there is nothing on the clipboard. This is ridiculous.
There’s no problem what type of font you use as long as they are big enough to see the image through it. In order for you to use the photo from your computer, you should open that in Photoshop (go to File menu, then click Open).
Thank you. I finally figured it out. A few people said that you are supposed to add a layer after adding each photo but that only applies when you take photos from the internet. Thanks for your quick response!
Thank you! Have tried a couple of web tutorials, but kept missing a step. This was perfect & easy to follow!
hi!,I love your writing so much! share we communicate more approximately your post on AOL? I need an expert in this space to resolve my problem. Maybe that’s you! Looking forward to peer you. befeeaeddegb
Wicked results, thanks!
https://imgur.com/o82MWig
How do you change the file extension?
sorry for the late reply. to change the file extension, go to Save As then pick the extension you want (JPEG, PNG, GIF, PSD, etc.)
yellow!!!!!!!!!!!!!!!!!!!!!!!!!!!!!!!!!!!!!!!!!!!!!!!! kept it frikin hillbilly
Thank you!! That was much easier than any other tutorials I’ve tried….
Best tutorial by far. Thanks!!!!
Hello, thank you for this tutorial, but I do not really understand the steps 4-7. I think these steps are unnecessary. After alpha to selection it is enough to hide the text layer and select the image layer and continue with step 8. I could do it this way.
Yes, you can do that way. There are actually many approaches to this. For example, when the text layer is done, you can also do the following steps to proceed:
– Click the photo layer and make a new layer. Fill this with white. Only the text should be visible by now.
– Right-click the text layer then click Text to Selection.
– Hide text layer by clicking the icon beside it.
– Now, click the New Layer (white). Right-click anywhere on the canvass then Edit>Clear.
Done!